Edit a Book / Add Content
Click the Edit Book link under your book’s listing in My Books. This will take you to theTable of Contents page for your book.
The Table of Contents screen offers a second row of tabs at the top that correspond to various editing, preview, and export functions (including a shortcut back to the Table of Contents).
In <PubML>™, each “chunk” of your book is called a “section.” Sections may correspond to chapters or they may include pages of photos, map graphics, title pages—pretty much anything that has its own listing in the exported eBook’s table of contents.
Buttons on the upper right allow you to create either a New Text Section or a New Full Page Image.
The New Full-Page Image button allows you to upload an image that you want displayed on a single page. For example, an image of the back cover or a full-page map can be fit to a single page within your exported eBook.
Note: It is not necessary to create a section for your eBook’s front cover. This section will be generated automagically when you export your eBook.
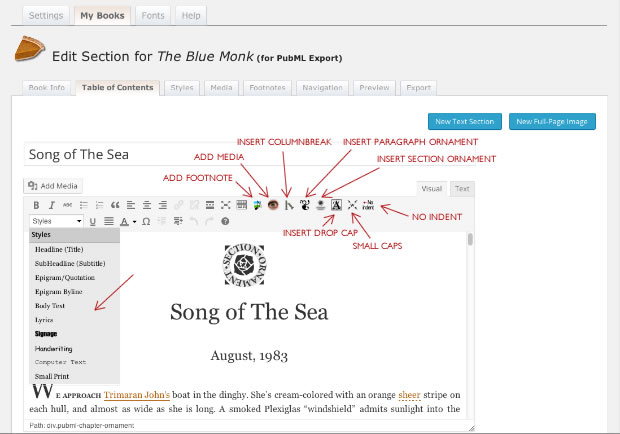
Clicking the New Text Section button opens <PubML>™’s custom text editor. If you’re already comfortable with WordPress, this screen will look familiar but you’ll find a few new tools and features have replaced the standard WordPress ones.
Don’t worry; if you want to create posts and pages in your WordPress site, those editing screens are unchanged.
Copy and paste a chapter from your Word Processor into the <PubML>™ editing screen. If you get funny characters or other anomalies, save your Word Processor file as a rich text file (RTF) and try again. Don’t worry about alignment, formatting, etc. The plain text is all you need.
Add a title to the title field. This title will appear in the exported book’s table of contents and in the <PubML>™ Table of Contents but not on the page of the exported eBook. If you want a title at the top of a chapter’s start page, add it to the beginning of your text.
The editing tools (make sure you have the “Visual,” not the “Text” tab selected at the top right of the editing area or the tools won’t show) contain a styles menu on the left and a number of icons on the right. Use these to modify your book’s typography.
Styles menu
Contains styles like headline (title), subheadline (subtitle). Body text, handwriting, computer text, signage, and other styles that can be applied to your text. You can modify these styles or create new ones in the Text Styles editor (discussed later). Highlight text and choose a style.Note: Occasionally, applying a style to one piece of text will apply it to text on adjacent lines. This happens because the text is entered in such a way that WordPress can’t tell where one paragraph ends and another begins. In these cases, use the “Text” editing mode instead of the “visual” editor to manipulate to view and edit the HTML formatting code. Often, a simple line break between text elements in the “Text” editor will allow you to switch back to “Visual” mode and apply styles.
Footnote Button
This allows you to select a word or phrase in the text and attach a popup Photo Footnote to it.This will only work after you have added footnotes to your book’s footnote library.
Add Media Button
This allows you to select a word or phrase in the text and attach a popup Media Screen to it. Media can include any combination of photos, Google Maps, and YouTube video playlists.This will only work after you have added media groups to your book’s media library.
Column Break
Forces text on your page to break to the next column.Separator Ornament
Inserts a small ornament into the text such as might be used to separate a short opening narrative from the main body of a chapter. You can choose from a selection of built-in ornaments in the Styles section or upload a custom one of your own.Regardless of your ornament choice, a placeholder ornament will appear in the <PubML>™ Section editor.
Chapter Ornament
Inserts a larger ornament at the beginning of a chapter. You can upload a custom chapter ornament in the Styles section (discussed later). Regardless of your ornament choice, a placeholder ornament will appear in the <PubML>™ Section editor.Insert Drop Cap
Highlight a letter and click the drop cap button to add a large initial capital at the beginning of a section. You can choose a drop cap style in the Styles section (discussed later).Small Capitals
Some typographers like to use small capitals for acronyms or at the beginning of a chapter for a few words to transition from a large initial cap into the standard body text. Highlight text and click the Small Caps button to format it in small capitals.No Indent
Typically, the first paragraph of a section is not indented. Click any paragraph and use the No Indent button to align the first line flush left.Add Media
Images added to your text using the WordPress Add Media button will be exported with your eBooks. Use this to embed images in your text but be aware that each image adds to your eBook’s final file size.
After you save a section, you can proceed directly to the next new section using the New Text Section or New Full Page Image buttons at the top right of the section editor, or you can use the tab at the top to return to the book’s Table of Contents.